How to get Immersive mode in React Native app?

Immersive mode is just a full-screen interface that you can build in your React Native app. While playing games or reading articles from a news app, you may have been distracted by the status and navigation bar. With a full-screen or Immersive Mode, you get an optimum user experience. However, for this, you need to frame a codebase in the app.js folder.
In this tutorial blog, you will learn about the detailed steps and the codebase to get an immersive mode with react native app development services
Let’s focus on the pre-requisites criteria
- If you have already worked on the React Native environment, you must have installed the software and packages needed for building a React Native project. If you have not, in that case, you need to install Node.js, an emulator, and Visual Studio Code editor. Check out the article to learn what other software and packages you have to get installed in your system before getting your hands on the React Native project. Also, note that we will be using React Native CLI for this project. So, while going through the linked article, you only need to get the software mentioned under the section React Native CLI.
- Also, you cannot embed the Immersive mode in your app, if you don't have a React Native app already built. So, you have to create a React Native app. You can go through this article to learn about the steps.
Consideration of third-party React Native libraries
There are different third-party libraries that you can install and store in your app directory. However, you have to choose third-party libraries based on the project requirements. So, you can learn about their utilities. For example, in this current project, I will be using react-native-android-immersive-mode. This will allow you to switch on and off the Immersive mode in your app.
If you are using React Native of version 0.60 or more than that, you don't have to use the auto-linking process, you can simply run react-native-immersive-mode --save on your app terminal. If not, you have to go through the step of auto-linking.
After installing the library, you have to import both the immersiveModeOn and immersiveModeOff from this library. We will explain this step in detail in the next section.
Explanation of code in the ImmersiveMode.js folder
Create a folder named Component in your app directory and then create a file named as ImmersiveMode in it. You have to create a codebase in the ImmersiveMode file and call it later in the App.js folder.
1
2
3
4
5
6
import {View, Text, AppState, Button, StatusBar} from 'react-native';
import React, {useEffect, useState} from 'react';
import {
  immersiveModeOn,
  immersiveModeOff,
} from 'react-native-android-immersive-mode';
We will start by importing the core components such as View, Text, AppState, Button, StatusBar, React, useEffect, and useState from react-native and react packages simultaneously. Besides, you have to import two other components: immersiveModeOn and immersiveModeOff from react-native-android-immersive-mode library. With these components, you will be able to build your app further.
Now, with the syntax, const ImmersiveMode = () => {, you need to specify a function ImmersiveMode. As you introduce this function, you also have to export the same function so that you can use the ImmersiveMode function in other files (here, it will be in the App.js folder). For this, you have to consider the export default statement.
The React Native hook, useState will be used to set the initial value of a variable isImmersiveMode. Here, the initial value is set as false. Consider the below-given syntax.
const [isImmersiveMode, setImmersiveMode] = useState(false);
With this following syntax,
1
2
3
4
5
6
useEffect(() => {
    if (isImmersiveMode) {
      immersiveModeOn();
    } else {
      immersiveModeOff();
    }
You can decide whether the isImmersiveMode is on or off. Here, I have used the JavaScript-based if/ else statement.
Now, it's time to import a Button and do the needed designing. You can refer to the following syntax for this.
1
2
3
4
5
6
7
<View style={{flex: 1, justifyContent: 'center', alignItems: 'center'}}>
      <StatusBar backgroundColor={'red'} />
      <Button
        onPress={() => setImmersiveMode(!isImmersiveMode)}
        title="Toggle ImmersiveMode"
      />
    </View>
Here, as you can notice, I have used the <View> component with styling objects like flex, justifyContent, and alignItems. Also, colored the background of the StatusBar red. The StatusBar will be displayed when the Immersive Mode is off.
You have to use a button component using which you can toggle the Immersive Mode off or on. You will use an onPress prop which indicates that when the user will press the button, the code will execute a callback action.
Getting into the code syntax in the App.js folder
The main task was already done in the Immersive.js folder. In the App.js folder, you only have to call the ImmersiveMode function. So, let’s get started with this.
1
2
3
import {View, Text, StyleSheet} from 'react-native';
import React from 'react';
import ImmersiveMode from './components/ImmersiveMode';
Other than the core React Native components, View, Text, StyleSheet, and React from the relevant package, you have to import the ImmersiveMode from ./components/ImmersiveMode.
Now you have to define a function App, where you will return the component ImmersiveMode. So add like the below-shown syntax.
1
2
3
const App = () => {
  return <ImmersiveMode />;
};
As we are done with the input, let’s see the output and the app execution part.
Running the ImmersiveMode feature on the emulator
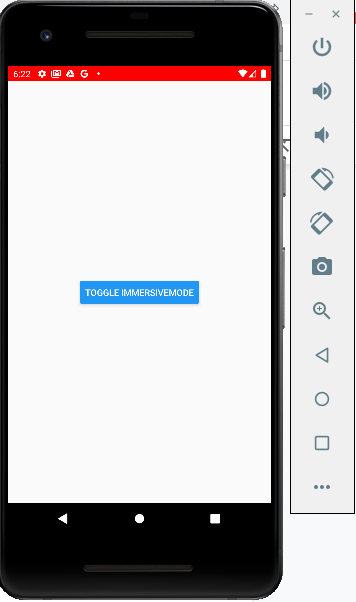
Open a new terminal from your project folder and run npm install. After this command, you have to run npx react-native run-android. As soon as your emulator starts, you will see the emulator screen as in image 1.

If you press the blue button, both the navigation bar and the red status bar will disappear and you will get an Immersive mode on your app.
So, you see how simple it is to activate the Immersive Mode on your React Native. You only need to learn the way to navigate through the code editor and run the emulator.

A science graduate who has a keen interest to lean about new technologies and research area. With an experience in the field of data analytics and content writing, she aims to share her knowledge among passionate tech readers.