How to access Files in a React Native app?

Saving important files or documents in your local drive and retrieving them in need is what the ‘file access’ features can allow you. With React Native app development company, you can easily embed this feature in your app. In this blog, I will explain the codebase with which you can create your file access feature in your React native app.
Even Before getting into a detailed explanation of the codebase, you need to be familiar with the prerequisites criteria and third-party package that will be used in this project.
Pre-acquired learnings and knowledge
- Install all the software such as node.js, android studio, virtual device, or emulator. This is needed because you have to get the React Native environment in your development system. If you are not familiar with the steps, check the article and get it done.
- Getting your files from your local drive is a feature but first, you have to learn how to build a basic React Native app so that you can add this feature to it. So check the article if you want to learn how to build and run a React Native app on an android phone.
Considered third-party React Native plugin:
react-native-document-picker
Third-party support is an excellent support that every developer enjoys while using the React Native framework. They don't have to burden the app with unnecessary components and heavy resources. They can use the React Native CLI tool and install only the library that they require for adding specific features.
Here, I have used the react-native-document-picker to get the component DocumentPicker. You will find other packages stored in the package.json folder. Also, you cannot use a specific package in your app-making process, if you don't install the same and store it in the package.json folder.
While creating the codebase of your app, you have to add the import statement and mention the component you want to use from that particular package.
Now let us get directly into the codebase.
Getting into the codelines in the App.js folder
1
2
3
import {Button, StyleSheet, Text, View, Image, Dimensions} from 'react-native';
import React, {useState} from 'react';
import DocumentPicker from 'react-native-document-picker';- Firstly, import the components. Here, you need to use Text, View, Image, Dimensions, StyleSheet, and Button from react-native. Later, in the second line, import the hook useState and React from react. Lastly, the vital component. Import DocumentPicker from react-native-document-picker.
- Going forward you will learn how to use these components and design the ‘File Access' app. Also, note that if you don't import the needed components at the initial segment of the codebase, you won't be able to use them later in the codebase.
1
2
3
4
5
6
7
8
9
export default function File() {
  const [file, setFile] = useState();
  const doce = async () => {
       const res = await DocumentPicker.pick({
      type: [DocumentPicker.types.allFiles],
    });
    console.log(res, '8');
    setFile(res);
};- With the export statement, you will return or export the function File().
- useState is the hook to set the value of the file. You can use setFile to change the initial value of the file. Moreover, the initial value of the variable file will be undefined.
- With the async()function, you call the DocumentPicker and select a specific file from your device.
- The syntax: DocumentPicker.types.allFiles defines that the app will allow users to pick any type of file.
- console.log() is for printing the res in a defined console. Res is also useful for debugging.
- Then, you have to use the setFile() function to change the file state to res. Res is referred to as response.
1
2
3
4
5
6
7
8
9
10
11
12
13
14
15
 console.log(file, '12');
  return (
    <View>
      <Button title="Take Document" onPress={() => doce()} />
      {file && (
        <Image
          source={{uri: file[0].uri}}
          style={{width: 100, height: 100, borderRadius: 50}}
        />
      )}
    </View>
  );
}

const styles = StyleSheet.create({});
- With the line console.log(file, ‘12’), you direct the code to log the file name and its size to the console.
- Now, you use the return() function to hold the View, Button, and Image components.
- As you can notice, you cannot use the Button and Image element without wrapping it under the parent View component. So, I have used a <View></View> component to hold a clickable button and a defined Image source with some styling parameters.
- Here, the Button has a title “Take Document” and an onPress prop. On pressing this prop will call the doce() function. As defined above, doce() function is linked with async() function and DocumentPicker component, it will allow users to access all types of documents stored in their local drive.
- The source attribute of the Image is set to file[0].uri. It means that the code will render an image of the first file in a directory.
- As per the defined styling parameter, it sets up an image with a width and height of 100 pixels and a border radius of 50 pixels.
- Close the View component with a tag </View> and start using the StyleSheet component to design it further.
- Since we are only into creating the interface of the ‘File Access’, we will not proceed further with the StyleSheet component.
We are almost done with the process. Let us get this task done by running the app on the emulator.
Getting access to file: Testing on the emulator
This is a two-step process. Without stretching, let’s see what the steps are.
- Open a command prompt and pass npm install. This will get you the requisite dependencies.
- On the same terminal pass npx react-native run-android. After some time, you will see, the emulator is enabled.
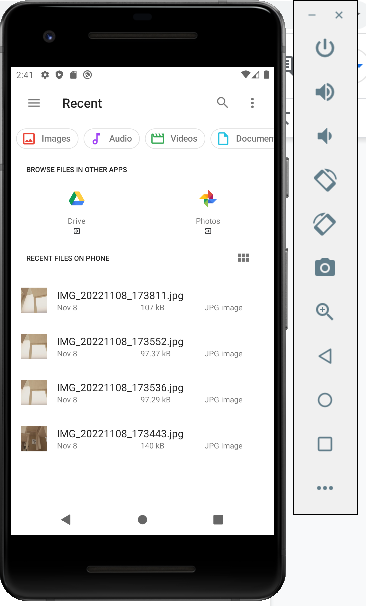
A screen with a blue button “TAKE DOCUMENT” will appear. Click on the button to access the local directory of your device. Note that you should have some files already stored in your device. Refer to image 1 for my local directory.

Image 1
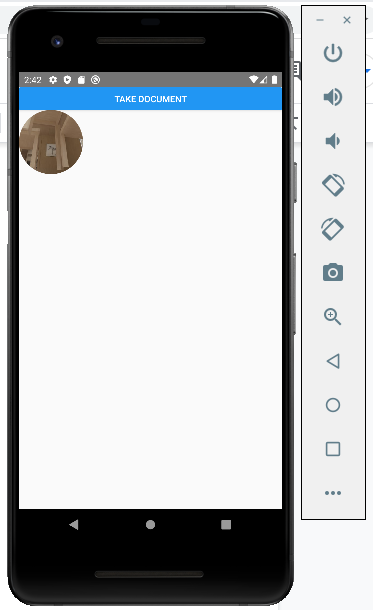
I have selected the fourth image and it appears as shown in image 2.

Image 2
Now, you see how easy it is to build a file access interface in your app. It will be much easier when you go through the entire process and build your own app. So get started and take your development journey a step ahead.

A science graduate who has a keen interest to lean about new technologies and research area. With an experience in the field of data analytics and content writing, she aims to share her knowledge among passionate tech readers.