Creating a carousel interface for your React Native app

Carousel being a part of UI allows developers to arrange contents or groups of elements in a presentation format. If you want to create a carousel interface and arrange your content in a structured way, then you need a React Native framework to get it done. Follow the blog to get a step-by-step process of creating a carousel interface.
What is a Carousel?
Carousel is a designing element, embedding in which you can present multiple elements of the same type. These elements can be texts, images, videos, and even graphics. It makes the UI of an app or website interactive. Also, how you design a carousel affects the UX of your website or apps. Carousels can also be called slideshows or sliders. This is because the elements embedded in it are rendered in a similar way to a PPT presentation.
The most popular use of the carousel is on Instagram. You may have observed that it is shown in a sliding format when someone uploads a group of pictures at once. Users can swipe horizontally to see the images or text elements. It has dots at the bottom of the posts indicating the number of images it holds.
Here, in this blog, we will create a similar kind of interface. So Hang on!!.
Also, you can use the carousel interface for scrolling article headlines.
As we have become familiar with the utility of the carousel, let's move forward with this project.
What is the Prior-needed context?
Here the main context you need beforehand is to learn the setup process of getting the React Native environment in your development system. For this, you require software like Node.js, Android Studio, and Visual Code Editor. Also, note that here we will be focused only on React Native CLI and not on Expo. So get the software installed accordingly. You can get detailed guidance from the attached article.
The other thing that you have to learn is to create a basic template using the React Native framework. You need this template to add your codebase for the carousel project.
Follow the below-given steps to build a simple React Native template.
- Go to the home screen on your system. I have named it ‘Project of React Native’.
- Open cmd from this folder and run npx react-native init Carousel_app --version 0.68.1.
This command will build the template with the name Carousel_app and the React Native version we are using is 0.68.1. - Now, you can see the Carousel_app template has been created in the ‘Project of React Native’.
Open the code editor from this template and start designing the project we are up for.
Building up the project in the App.js folder
Here, what you have to do is create the codebase. Let's understand it step-by-step.
Import all the components needed for the project.

Image 1
For the project, you will need the components mentioned in image 1. To create this carousel interface, you don't need to install any third-party plugins. All the components are imported from the react-native library.

Image 2
The snippet shown in image 2 introduces a function App. Later at the end, you have to export this same function as a component so that you can use it in other files.
imgActive is a state variable used in this code. setImageActive keeps track of the state of imgActive. useState is used to set the imgActive’s initial value as 0.

Image 3
Here, in image 3, the code shows the image source that I have added to my carousel interface, you can add it as per your preference. Also, you can add more than 3 images. This is in array format. Note that, if you are adding graphics in a carousel, you have to be consistent on all the pages of the carousel. This means that you need to add elements of the same type.

Image 4
In image 4, the code tracks if the user has scrolled through the carousel slide.
If the user has scrolled the slide, the code passes the parameter nativeEvent.
It uses Math.ceil function to measure the count of the slide. The formula used is contentOffset.x divided by layoutMeasurement.width. If the answer calculated is not the same as that of the active slide number, the code calls the function setImageActive indicating the new slide.

Image 5
The code snippet in image 5 creates the ScrollView for the carousel interface. It returns the View component with a Container wrapped inside it.
The ScrollView is in horizontal format and has pagingEnabled. The onScroll function is called when the user scrolls. It further calls the onChange function with an argument nativeEvent. Also the scrolling indicators for the horizontal view is disabled.

Image 6
This is the extended part of the ScrollView function. Here, in image 6, the code introduces an Image component with the source parameters. The images are loaded from the URL specified in the source property, and their size is set to be equal to the window width and height.

Image 7
The code syntax in image 7 renders images with few dots in them. These dots will show the number of slides built into the carousel. It will also allow the user to identify which images are currently active.
Finally, you export the App and start using the StyleSheet component.
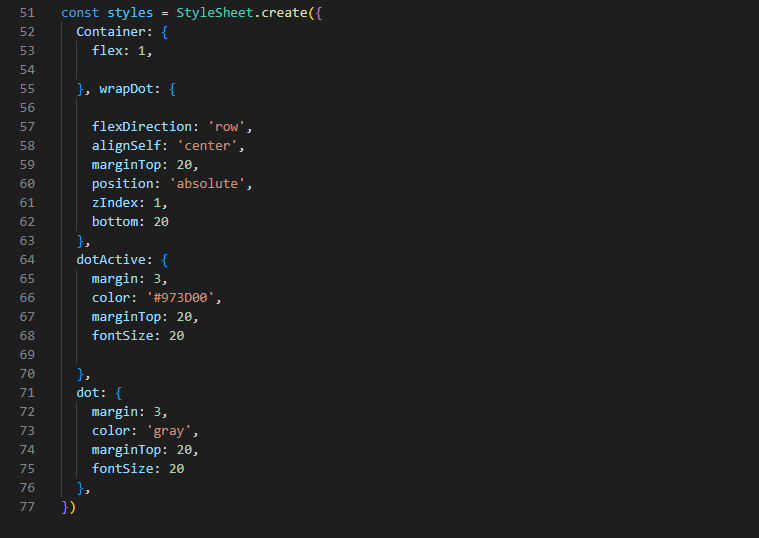
Let’s see how you can do this. For this consider snippets of image 8.

Image 8
Apart from the styling parameters I have used for the styling objects (dot, dotActive, WrapDot, and Container), you can incorporate other styling parameters. These are the basic parameters.
After you are done with the codebase, you have to run the program.
Run the program on a device
For this project, you can consider an emulator.
Go to the cmd from your project and execute npm install. After this, run npx react-native run-android on the same terminal. Wait for a few minutes till the emulator starts.
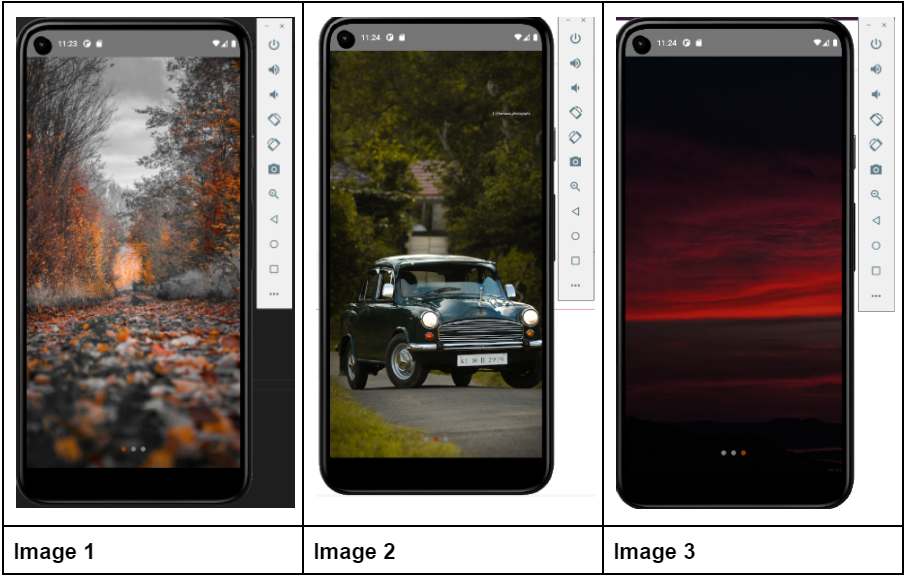
After it starts, the carousel interface will be rendered on your emulator screen as shown follows.

As you can see three dots are placed in the bottom. The red dot indicates the active image on the emulator.
This way, you can add different images, graphics, and other elements to the carousel and make your project much more interactive.

A science graduate who has a keen interest to lean about new technologies and research area. With an experience in the field of data analytics and content writing, she aims to share her knowledge among passionate tech readers.