Building a Range slider using React Native framework

Creating a front-end design with an interactive range slider is possible with the React Native framework. However, you have to get the right approach in setting up the environment, installing third-party RN libraries, and others. In this blog, we will cover each and every step.
So, let's get started.
Explain a Range Slider in brief
A range slider is a sliding element with a defined range set in it. You can customize the slider by adding different styling parameters to it. These sliders are clickable as in users have to click on the pointers to slide through the set range. A range slider is generally used where users have to deal with a range of numbers.
With this, I mean to say an eCommerce or an online shopping app. You may have seen a filter where you can set your budget using a slider and then search for the products you need. This will allow the user to stay on a budget. Thus, it is the use of a range slider in an app.
There are different types of range sider that you can build for your React native app. However, our main concern is to learn a basic range slider. Let’s get into this.
Now we have to get familiar with some learnings.
Prior-required learnings for the React Native project
The following two are the prime learnings that you cannot skip if you are building a project based on the React Native framework.
- Getting React Native Environment- You can directly go to the step of building a basic template if you have already set up the environment of React Native in your dev system. However, if you are at the beginner level, you need to go through the entire setup process. This includes installing Node.js of the most recent version, Android Studio, setting up the emulator or Virtual Device, and downloading an IDE (in my case, it is the Visual Code Editor). Visit the linked blog, if you are looking for some reliable resources.
- Making a basic template- This is the second step where you have to build a template or file in your system’s C drive. For this, consider any empty folder in your C drive. Open the cmd from this folder and run npx react-native init SliderProject --version 0.68.1. Hit enter key on the keyboard and your template will be created.Now, you have to get the plugin (third-party library).
- Third-party React Native plugin- Here, we have to install the npm i @ptomasroos/react-native-multi-slider. This is a JS-based plugin used for getting the MultiSlider component. There is a specific command that you have to run in your app terminal. The command line is
npm i @ptomasroos/react-native-multi-slider. Starting with the codebase

Image 1
For any React Native project you start with, you need to import the relevant components from the React Native framework.
In this project, we need StyleSheet, TouchableOpacity, Dimensions, View, and Text. These are from the react-native library.
useState is taken from the react library.
Lastly the main component, the MultiSlider is imported from the third-party plugin @ptomasroos/react-native-multi-slider.

Image 2
Here, useState is used to set the state of the variable value. SetValue is considered for updating any change in the values of the value variable. The initial value of the variable value is set between the range [0,37].
multiSliderValuesChange is the function introduced in the code syntax. Within this function, the setValue method is specified. An object with values as the keyand the parameter values as its value is embedded.

Image 3
This syntax is about rendering the container, slider_box, and the text element ‘slider. The styling parameters added to each of these view and text elements are defined at the end of the codebase. You can refer to the segment where the StyleSheet object is introduced in the codebase.
This is the ease of using the JS-based framework React Native in app development or adding any features to your app. You don't have to write code multiple times. Rather you can write the entire code structure in a part of the codebase and you can direct the segment whenever needed.

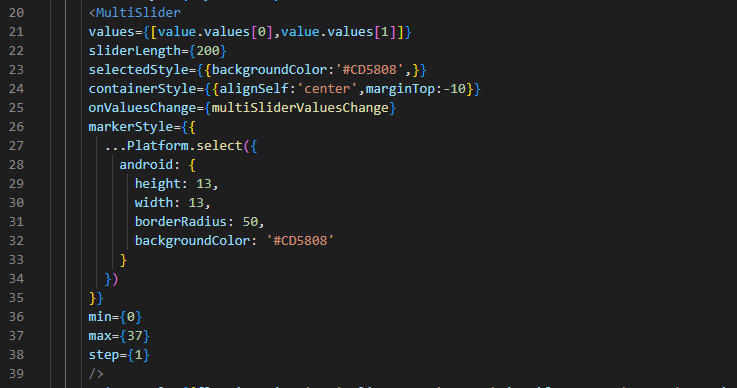
Image 4
The code introduces a MultiSlider that has two values, value.values[0] and value.values[1]. The slider length is set as 200px. There are three styles: selectedStyle, containerStyle, and markerStyle.
OnValuesChange is activated when the user changes the values on the slider by dragging it or clicking on it.

Image 5
This snippet shown in image 5 is all about embedding the styling element for the main container and the text elements ‘min’, ‘-’, and ‘max’.
Note that all the text elements are wrapped within the View component.
For the View element, the flex direction is set in the row direction, items are aligned at the center, content is justified at the center and the top margin is set as -20 pixels. You can design the container as per your preference such that you can change the alignment, flex direction, and other parameters.
Also, for the color, you have to use a particular color code. For example, here I have used the code #DBDBDB for all three text elements.
Finally, you need to export the App component that you have created so far.

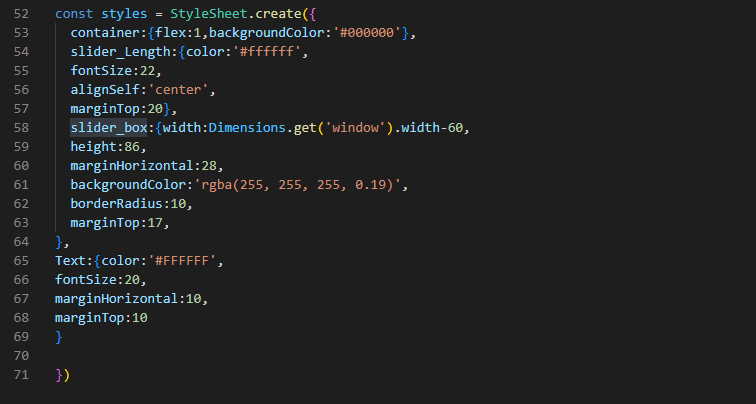
Image 6
This is the final section of the codebase after which you have to save the code and run the program.
What you have to do in this last segment is use the StyleSheet component and wrap all the styling objects. Here, I have considered the container, slider_Length, slider_box, and Text.
Steps to execute the codebase
Open the command prompt. Note that you need to open the command prompt from your project or app in which you have embedded the code.
Then you have to run two commands one after the other.
The first one is npm install and the next one is npx react-native run-android.
After you hit the enter key, it will start bundling.
Sooner your app will start on the emulator with the interface of the created range slider on it. Refer to image 7 for the output.

Image 7
As you can take note of the output shown in image 7, you can move through the slider and set the range.
Isn’t it interesting? Practice now to get a hand on this project.

A science graduate who has a keen interest to lean about new technologies and research area. With an experience in the field of data analytics and content writing, she aims to share her knowledge among passionate tech readers.